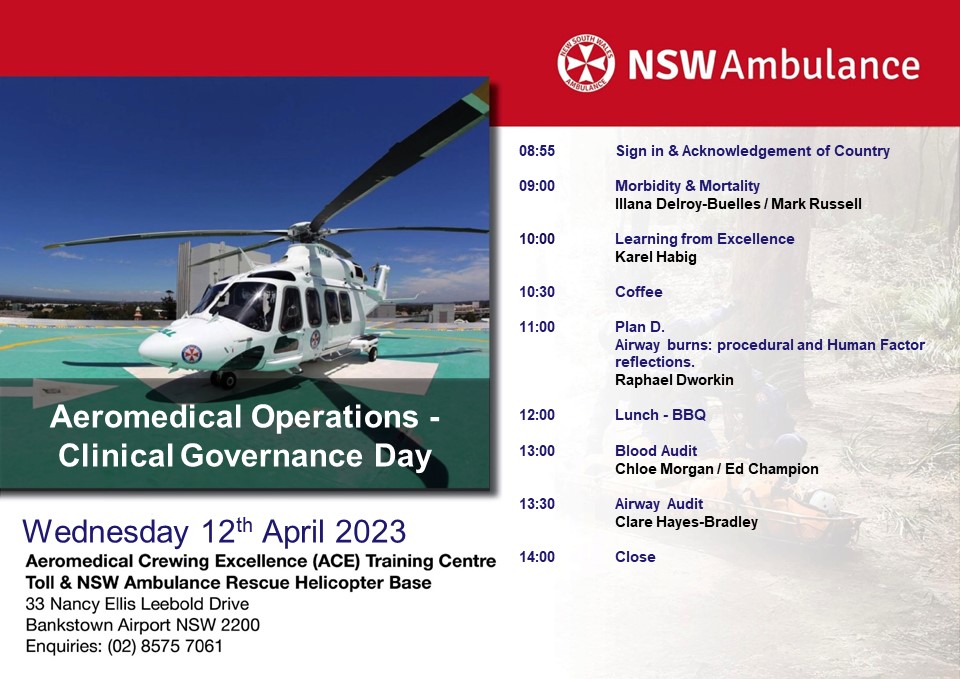
It is a rare but confronting situation where a pre-hospital and retrieval medicine team are presented with a sick newborn. At one of our recent education days we heard Dr Mark Russell and Dr Mark Newcombe deliver excellent presentations of cases which they had been involved in, involving resuscitative hysterotomy and neonatal resuscitation respectively. Both of these cases reflect some of the high acuity, low occurence scenarios which our teams are prepared to respond to. As a pre-hospital and retrieval service, it’s rare for us to even be around in the first few minutes of a baby’s life, but as our colleagues described, not impossible. So, we took the opportunity to review some of the key issues and processes involved in Neonatal Life Support (NLS) and how we can deliver this using the equipment in our packs.
The newborn in a nutshell
Let’s start with some basics. To those working regularly in neonatology the peculiarities of neonatal physiology will seem second nature. For the rest of us, it is worth spending a moment to revise these as it’ll help to focus on the key interventions needed to resuscitate a newborn.
Airway
The neonatal airway is small, and easily compressible. A large occiput naturally flexes the head and neck unless a small shoulder roll is placed (in contrast to the positioning for older children and adults). It sounds unlikely but babies actually should not have particularly difficult airways (aside from the presence of other syndromes or sequences, for example Pierre Robin).. so long as you know how to manage a baby airway. Like so many skills, it’s easy when you know how, the hard thing is getting the practise. More on airway skills later.
The nutshell: Aim for neutral positioning with a shoulder roll and take care not to compress soft tissues
Breathing
The first breath and cry at birth initiates a series of physiological changes which switch a baby’s circulation from one where oxygenation takes place at the placenta, to one where the lungs are now inflated and responsible for gas exchange. The pulmonary vascular system which is high resistance in utero, now switches to a low resistance system causing the foramen ovale to shut almost immediately at the first cry. The ductus arteriosus follows shortly after, within around six hours, closing off the communication between the aorta and pulmonary artery. It takes a little while for the sats to normalise – use the guide printed on the NLS resuscitation chart for comparison – and always use pre-ductal sats (ie from the right hand). High alveolar resistance means you’ll need higher inflation pressures and always use PEEP (think 30 cmH2O PAWP and 5 cmH2O PEEP). While babies rapidly become bradycardic in response to hypoxia, they are also at risk of retinopathy when exposed to high fractions of oxygen, so it is usual to begin resuscitation in air but increase inspired oxygen fraction as further resuscitation is required.
The nutshell: Hypoxia is very poorly tolerated. Resuscitate in air first, and use higher inflation pressures than you would with adults.
Circulation
We’ve discussed some of the circulation changes at birth above, but as ever, there’s more to consider. The heart muscle is relatively immature, and therefore cardiac output is maintained via heart rate. Babies have a relatively high sympathetic tone which contributes to the elevated heart rate with little room to compensate with contractility… and yet they also have plenty of vagal tone which you may discover when attempting laryngoscopy. The Frank Starling response to volume is more fragile than in adults and it’s relatively easy to fluid overload a baby.
The nutshell: Bradycardia is to be considered a bad sign (but is usually best treated by correcting hypoxia!)
Exposure
Babies get cold quickly. Cold babies can become hypoglycaemic, hypoglycaemic babies develop apnoeas and eventually hypoxia. Temperature therefore needs to be proactively managed from birth to avoid that spiral.
The nutshell: Most babies don’t need intervention at birth, and those who do respond to stimulus and warming, with no further help required. Consider skin-to-skin on Mum’s chest to keep an otherwise well baby warm.
Resuscitation toolkit
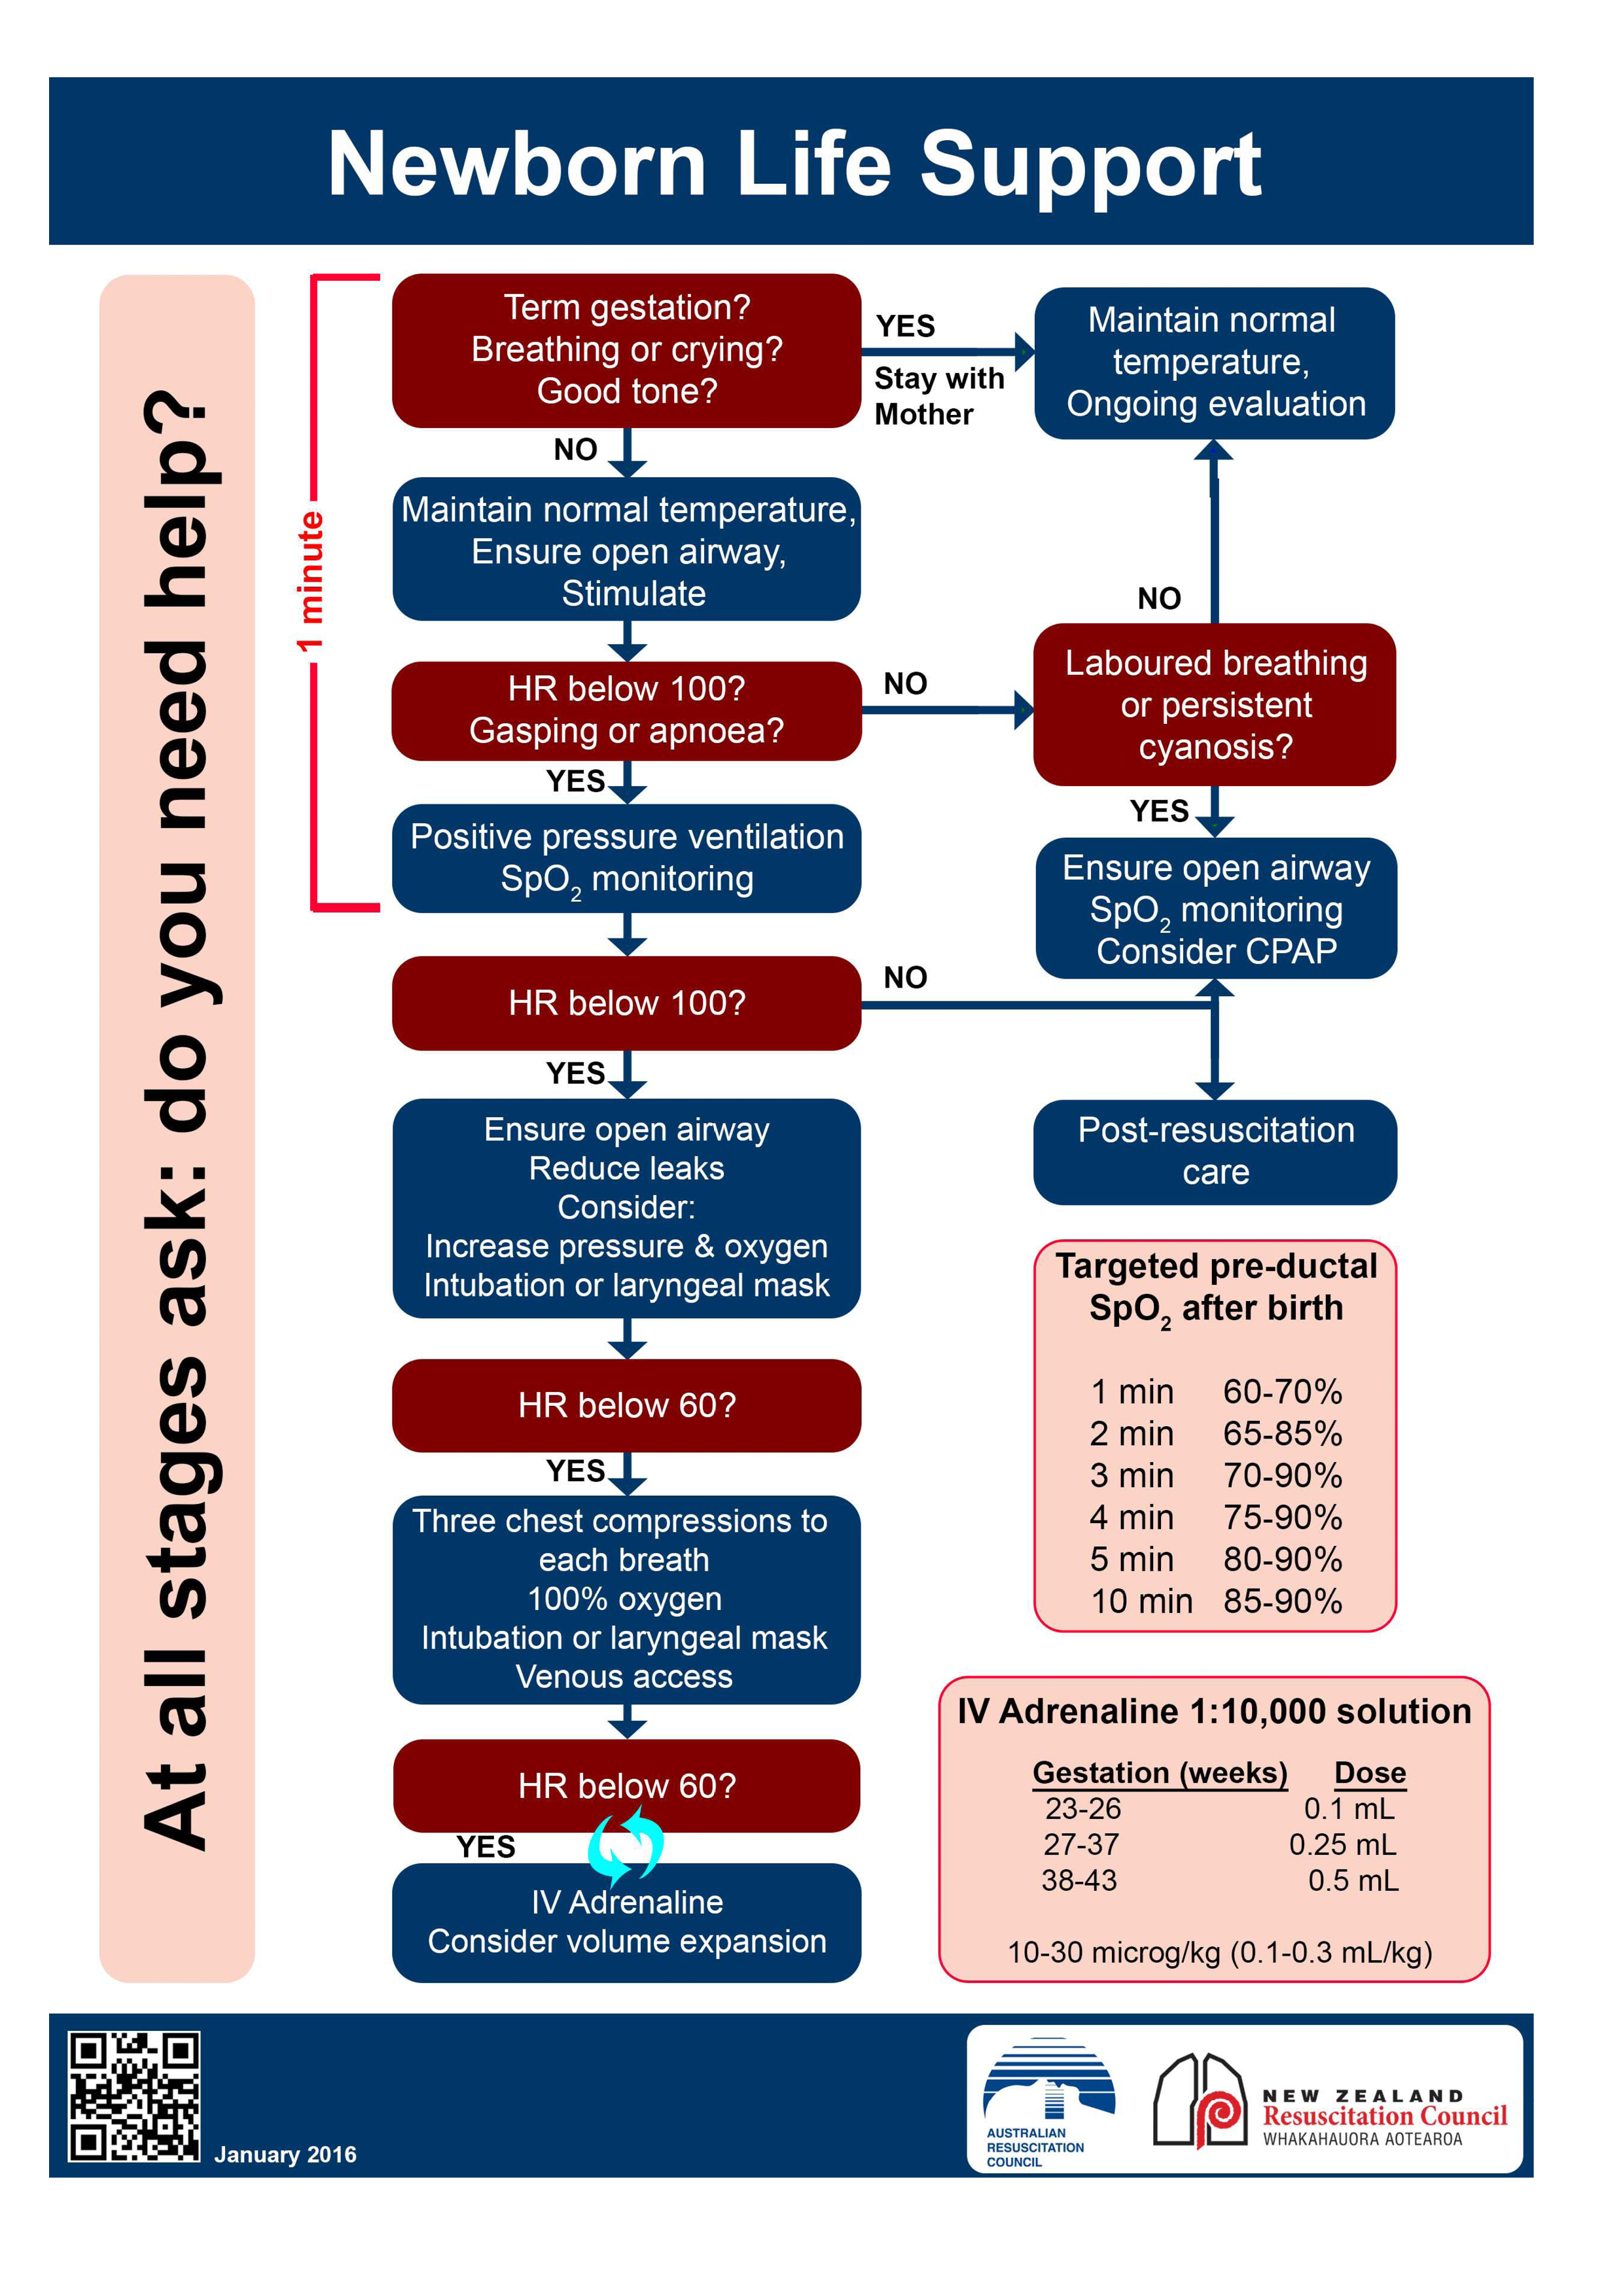
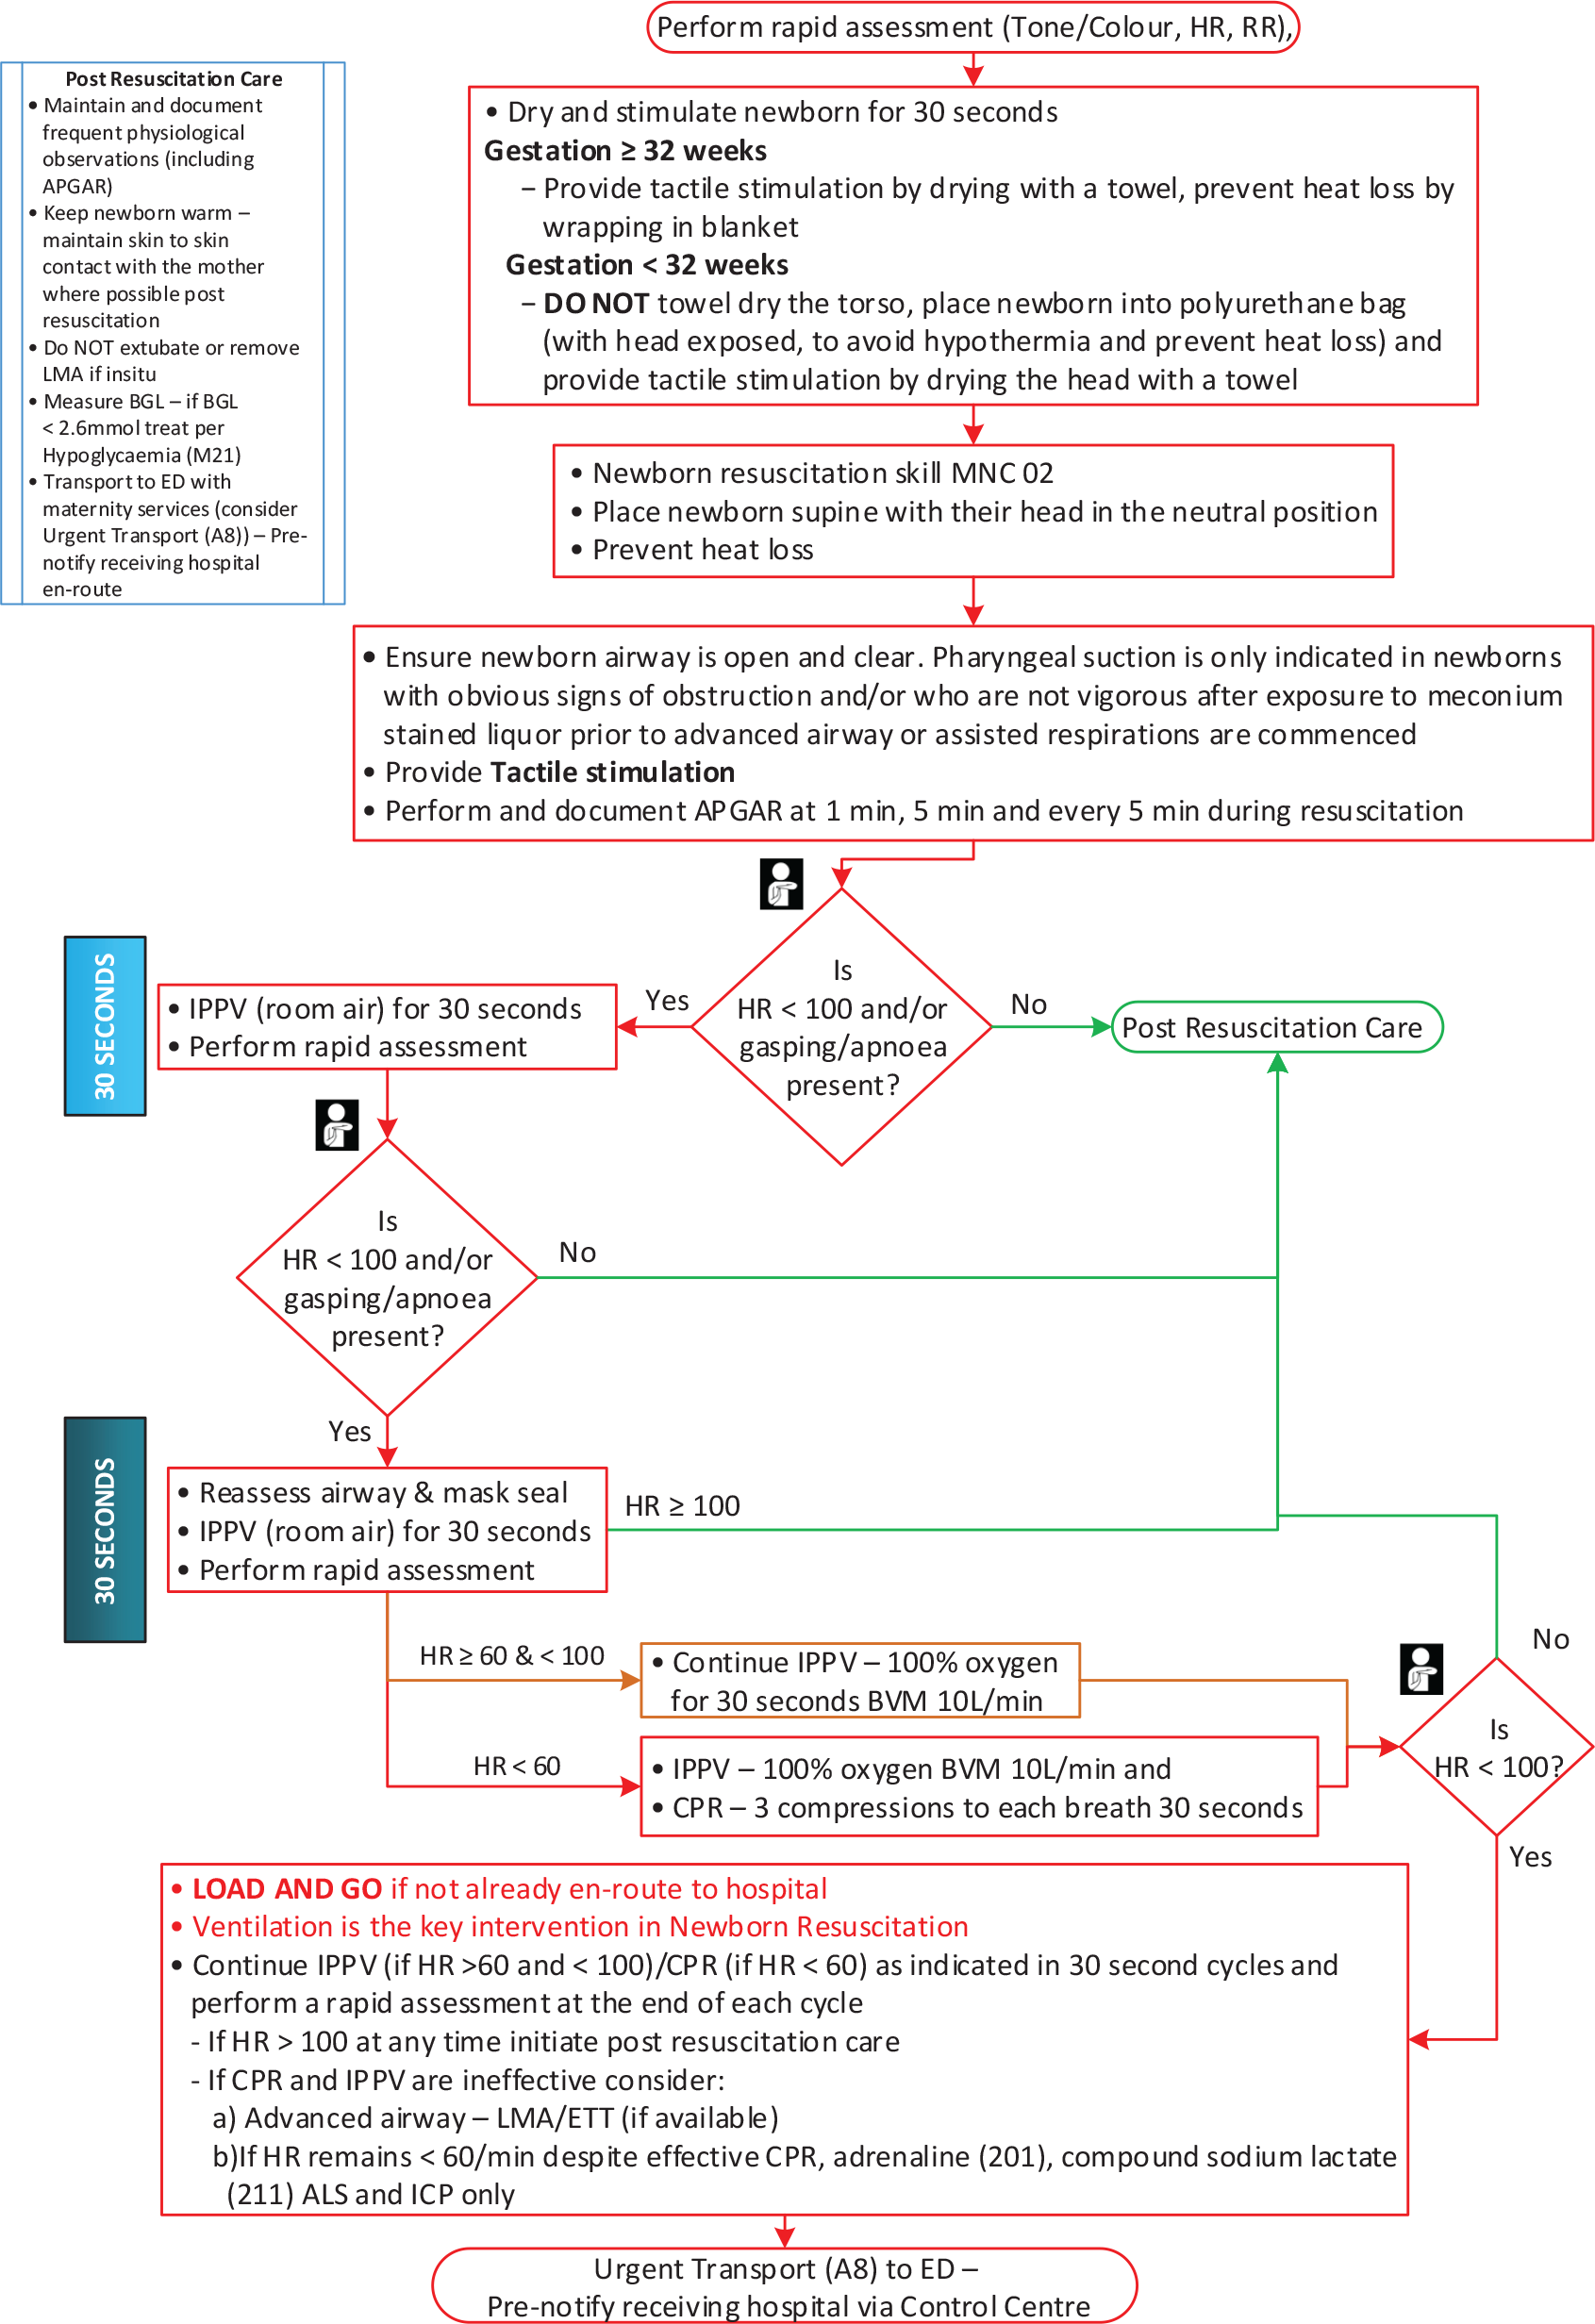
We used the Australian Resus Council NLS algorithm as the basis of our workshop, given this is most likely to be familiar to everyone working in critical care regardless of their base discipline. We also referenced the really excellent NSW Ambulance algorithm found on the app as this has been modified for the pre-hospital environment. For those working in NSW ambulance it is worth having the NSWA app on your phone, and the NLS algorithm is easy to find under maternal emergencies (Protocol OP4).
NLS algorithm
NSWA algorithm
Preparing for your resuscitation
You may have two patients on your hands, if Mum is unwell in any way. This presents an additional challenge in terms of resource management – recruit extra hands early, and consider the need for a second medical team.
Don’t forget that every ambulance has a maternity kit with bunny rugs, surgical gown, umbilical cord clamps, nappy, tiny warm hat…
Consider reducing the risk of hypothermia by working inside the ambulance, and warming the vehicle, particularly in winter.
You may also consider using the warming blanket from the red pack as an under-body warmer, placing this underneath your resuscitation area and then a bunny rug on top to minimise contact with the warming units.
Baby is born, now what…
Start a timer at birth, this will help you keep track of baby’s trajectory. If you have additional hands, delegate a team member to time-keep and scribe.
Warm and stimulate – use a dry towel to rub baby down then change the towel for a clean one or a clean bunny rug. This will take around a minute and often is the most intervention that is required!
Note: a premature baby <32/40 should not be dried – placing the baby into the polyurethane bag so that just head is exposed will help to avoid hypothermia for these babies. Dry their head with a towel which will provide tactile stimulus, and ensure to place a hat if available.
Open the airway – neutral positioning, consider a shoulder roll, avoid compressing soft structures.
Suction – this is a source of constant debate, relating to the risk of aspiration in a baby who is born with significant meconium staining. If baby is already crying, then suction is unlikely to be beneficial. An obtunded baby who has obviously heavy meconium in the airway may benefit from soft suction (use a Y sucker rather than the DuCanto we carry!).
First assessment
Your initial assessment will be based on tone, colour, respiratory effort and heart rate, commonly expressed as an APGAR score (see table). Some tips…
Use the brachial artery or the umbilicus to feel for a pulse; femoral artery is also a useful pulse point in neonates.
The APGAR is useful for handing over later on, but try to avoid being distracted by calculating the APGAR if the baby in front of you clearly needs to be resuscitated
It is extremely unlikely that even the healthiest baby will score an APGAR of 10 at the first minute!
If baby is crying, pink, vigorous and has a good heart rate >100 then wrap them up warm with a hat and pass to Mum, your work is done…
If baby has an increased work of breathing or poor respiratory effort, poor colour, poor tone and/or has a heart rate of <100 then your next step should be to provide ventilatory support.
IPPV
Use the round facemask, attach a PEEP valve at 5 cmH2O. Resuscitate in air in the first instance, and reassess at 30 seconds. Be meticulous with your airway management and ensure you are achieving good inflation. Chest rise is the best guide. If the heart rate has not improved after 30s then increase O2 to 100% and attempt further ventilation.
Reassess again after another 30s.
HR <60
If the heart rate drops below 60 then this is an indication to start CPR. One rescuer should use two hands encircling the baby’s torso with thumbs to provide chest compressions, with a ratio of one breath to three compressions. A secured endotracheal tube may help you to provide more effective ventilation, so it is worth attempting intubation. Be mindful to avoid task fixation, however, and consider an adjunct like an LMA (size 0 carried by regular ambulances) if intubation is difficult.
Remember: fixing hypoxia is the most effective intervention.
Intubating babies
It sounds silly to say, but everything is small. Your movements with the laryngoscope should therefore also be small. Traditional teaching is to use a miller 0 blade in the neonate, but in reality it would make sense to use the technique you are most familiar with (usually a mac blade unless you’re a paediatric anaesthetist).
Expect the epiglottis to be long and floppy, so you are more likely to get a controllable view if you pick it up with the laryngoscope.
If using a miller blade, aim to get the tip into the oesophageal inlet then very slowly withdraw the blade until the glottis drops into view (remember, micromovements are the key!).
Use ELM to assist you, and consider using a stylet in the ETT to aid your control.
Avoid task fixation, monitor SpO2 during your laryngoscopy attempt and consider using an LMA #0 if you are not able to intubate
Once intubated, be aware that the tiny, soft tube is easily bent and kinked. Use tape to secure it, and ensure it doesn’t coil up within the mouth, making extubation more likely.
Always consider siting an NGT in the intubated child, as decompressing the stomach will reduce splinting of the diaphragm. Any amount of pre-intubation crying or positive pressure ventilation massively increases the risk of this.
Reassess at 45-60s
If the HR has improved to >100, maintain ventilation, keep baby warm and move towards hospital. Place a sats probe on the right hand. Consider switching to air if significant improvement in sats and APGARs.
If the HR is 60-100, maintain ventilation, keep baby warm and move towards hospital, place a sats probe on the right hand, continue oxygenation at 100% until HR improves. Reassess progress every 30s.
If HR <60 continue chest compressions. Secure IV access, give adrenaline, consider IV fluid bolus (10mL/kg).
IV access
Your options:
24g IV to dorsum of the hand or the long saphenous vein. This is likely to be difficult in a shocked baby.
IO access: The smallest needle we carry is likely to be quite large for a neonate.
UVC: Our 20g femoral arterial lines (interhospital pack, IV access pouch) could be of sufficient gauge and length for umbilical access, ensure it is flushed with saline prior to insertion. Clean with betadine (blue bag, red loaf) and cut the cord, leaving plenty of length for hospital teams to re-access the umbilicus where possible. The large, compressible, single venous lumen (rather than the two smaller, muscular arterial openings) should accommodate the line. Using sterile gloves, advance until you achieve flashback, use an endotracheal tube tie around the umbilicus to secure in place. Manage the line as you would a central line, and ensure that it is handed over to hospital staff as a pre-hospital UVC.
Adrenaline
IV: 10 mcg/kg (or 0.1-0.3 mL/kg of 1:10,000 adrenaline, eg 0.5mL in a term baby).
ETT: 50-100 mcg/kg (or 0.5 – 1mL/kg of 1:10,000 adrenaline) via ETT if IV/IO/UVC access unattainable
Fluids
It is unusual for babies to be hypovolaemic as a primary cause of arrest, but a fluid bolus of crystalloid 10 mL/kg may be attempted at this stage. Where there is a history of antepartum blood loss, consider giving blood 10 mL/kg. The easiest way to do this in both instances is using a 50mL syringe (interhospital pack, side pocket).
Human factors
Managing a neonatal arrest is challenging on every level, and is not comfortable territory for anyone regardless of your experience or speciality background. It is extremely unusual for a neonate to arrest, and therefore constitutes a massively stressful event for anyone involved. Role allocation and teamwork will help to keep this under control – if you have enough team members, consider allocating a team member to read the algorithm and act as scribe, allocate another team member to draw up drugs, and consider calling for clinical support from the DRC. ACC can also source support from a NETS consultant for you via teleconference (bear in mind this may consume additional bandwidth though).
Post-event
As ever with a case like this, it is important to recognise and acknowledge the emotional fallout which can follow. Look out for yourself, and look out for your colleagues and use the avenues available to you to seek support, be it family and friends, colleagues, or via the employee support services.
ReferencesKariuki, E. et al. (2021) Neonatal resuscitation: current evidence and guidelines. BJA Education. 21 : 12, 470-485. Doi: https://doi.org/10.1016/j.bjae.2021.07.008
This post covers section 1.2.13 of the DipPHRM curriculum.
In infants, a blood pressure cuff can be used as an effective pelvic splint.
Post-RSI sedation in paediatrics is cognitively challenging. Take the time to sense-check the dosing strategy you are using. The NETS calculator might be a useful resource if you are looking for one…but get familiar prior to using it on a job.
Suspension trauma leads to orthostatic cardiac arrest – lots of case reports of patients dying after climbing accidents where they are suspended, but without apparent injury. Check out this paper.
Grade IV view on DL/VL? Remember the option to insert blade deeply and slowly withdraw to see if the anatomy becomes clearer.
In aneurysmal SAH patients, nimodipine reduces risk of delayed cerebral ischaemia. In general, this should not be withheld in the context of hypotension. It is safer to give the nimodipine and up-titrate vasopressors.
Faced with a post-op patient with jaw wires requiring intubation? The wires can easily be removed with forceps. Grasp the wire and rotate twice. Watch this video.
There are two approaches for retrieving the patient with an EVD in situ: – Keep the EVD open throughout the retrieval except during the immediate patient bed/stretcher transfers. – If turbulence/rough journey anticipated, consider leaving EVD closed and intermittently open (every three to five minutes). (**Might be worth re-reading the Neuroprotection Clinical Practice Standard)
Movement of arms into crucifix position to facilitate thoracostomies may dislodge humeral intraosseous lines. Keeping the patient’s thumbs down (which internally rotates arm at the shoulder) may mitigate this. Watch this video.
Agitated patient? Remember to use non-pharmacological strategies in the first instance: – Removing sources of confrontation (including police) – Treating the patient with respect – Managing pain – Taking the time to explain intentions and reasoning
Don’t be completely reassured by the suspected inhalational burn patient who is asymptomatic. In this study 30% had pathologic findings on fibreoptic laryngoscopy despite no symptoms. However, we are probably intubating too many of these patients, even if symptomatic (also worth checking out this study).
Thanks for a great month of case discussion! The C+C QI project team
Every morning our team discusses cases over coffee.Here is a useful snippet…
Patients with a severe high anion gap metabolic acidosis (e.g. from severe DKA, AKI, toxic ingestions, severe lactataemia from bleeding/sepsis/some other form of badness) have a markedly increased respiratory drive to achieve the high alveolar minute ventilation required for their compensatory respiratory alkalosis. This manifests as “air hunger” (Kussmaul breathing).
Loads of bad stuff happens when the pH gets below 7.1-7.2. Chiefly: – Reduced myocardial contractility – Risk of arrythmias – Poor response to catecholamines – Hyperkalaemia – CNS depression – “Air hunger”
When hypocapnia is already present due to the compensatory respiratory alkalosis, escalating hyperventilation results in increasingly marginal decreases (and ultimately a plateau) in pCO2 (1). This results in profoundly acidaemic states despite the patient maximally compensating. Minute volumes can climb to over 30L/min.
This respiratory drive is very challenging (often impossible) to match with a mechanical ventilator. Therefore, spontaneous breathing should be maintained for as long as possible, whilst treating the underlying cause.
In the maximally compensating patient, even a brief apnoeic period can lead to a devastating drop in pH given the loss of the already inadequate respiratory compensation. Performing an RSI in the patient with a profound metabolic acidosis is, therefore, an exceptionally dangerous procedure.
We’ve all seen the sick ketoacidotic patients with extraordinarily abnormal blood gases who manage to turn a corner and avoid intubation after prompt initiation of volume resuscitation and an insulin infusion.
However, when these patients get tired and/or severely obtunded they become increasingly unable to maintain their respiratory drive, rapidly circle the drain, and we have no choice but to proceed with RSI.
Below are some key points to consider in this challenging situation.
Do we really need to intubate? – These patients are extremely high risk of cardiac arrest intra- or post procedure for the reasons explained above. – Can we wait a little longer for the treatment to take effect, and potentially avoid RSI?
Consider a trial of BiPAP – If tolerated this might buy you time. – The machine will also provide a useful estimate of the minute volume to try and match if/when mechanically ventilating.
Minimise apneoa – Bag valve mask ventilation with a two-person technique must be performed after induction drugs are pushed. – Use your most experienced laryngoscopist – the tube needs to go down first pass, and as fast as possible.
Common pitfall – ventilating to normal pCO2 – This will precipitate a rapid deterioration in pH and cardiac arrest. – The patient needs to be hyperventilated/hypocapnic. – Delegate someone to keep a close eye on the ETCO2 pre/intra/post procedure (ensure it isn’t rising).
Use Winter’s Formula – Winter’s Formula tells you what the pCO2 should be if the patient is maximally compensating for their metabolic acidosis. – Get a blood gas pre-RSI and do the calculation:
Expected pCO2 = 1.5 x HCO3 + 8 (+/- 2)
– This will be your target pCO2 when the patient is on the vent. – Post RSI, set the vent to achieve approximate a minute ventilation according to the below table (a rough starting point in adult patients) (2).
Target pCO2
Minute Ventilation
40 mmHg
6-8L
30 mmHg
12-14L
20 mmHg
18-20L
Rough guide for minute ventilation to achieve a target pCO2 in adult patients
– Get another blood gas within 15 minutes post-RSI and adjust as needed. – Don’t rely solely on ETCO2 (get a gas), it is not a perfect surrogate. In a patient with normal lung function the ETCO2 value is usually 2–5 mmHg lower than the pCO2 (5).
Awake intubation? – This would be ideal as it would negate the need to paralyse the patient and, therefore, preserve the native respiratory drive. – However, application of the topical anaesthesia can take time that we often don’t have with these patients. Furthermore, they are often not compliant enough in their state of extremis.
Bicarb? – As a therapy for HAGMA? don’t bother. No evidence that giving sodium bicarbonate of any therapeutic benefit. – It is indicated in certain specific situations which may be accompanied by a metabolic acidosis: TCA OD, urinary alkinisation for salicylate poisoning, NAGMA due to bicarb loss from renal/GI tract, hyperkalaemia (3, 4). – Bicarb ultimately generates CO2 which likely puts further strain on a maximally compensated patient.
Unrecognised metabolic acidosis? – Prior to ANY RSI have a brief pause point and check the respiratory rate/breathing pattern: – Is the patient moving a lot of air? If yes it could be Kussmaul breathing. If in doubt, get a blood gas.
References 1. Capone J, Gluncic V, Lukic A, Candido KD. Physiologically Difficult Airway in the Patient with Severe Hypotension and Metabolic Acidosis. Case Rep Anesthesiol. Sep 2020 2. Frank Lodeserto MD, “Simplifying Mechanical Ventilation – Part 3: Severe Metabolic Acidosis”, REBEL EM blog, June 18, 2018. Available at: https://rebelem.com/simplifying-mechanical-ventilation-part-3-severe-metabolic-acidosis/ 3. Use of Bicarbonate in Metabolic Acidosis, Anaesthesiamcq.com https://www.anaesthesiamcq.com/AcidBaseBook/ab8_7.php 4. Sodium bicarbonate use, LITFL, https://litfl.com/sodium-bicarbonate-use/ 5. High-Risk Airway Management in the Emergency Department. Part I: Diseases and Approaches. Lentz S, Grossman A, Koyfman A, Long B. J Emerg Med, 59(1):84-95, 12 May 2020
Part of our education day on Jan 4th 2023 focussed on the rare but confronting need to move to one lung ventilation (OLV) in the pre-hospital or retrieval environment. We heard from Dr John Floridis, a rural generalist and emergency physician who, while working remotely in the Northern Territory, found himself in that exact position. He presented a case of a severely injured trauma patient who required emergency thoracotomy and OLV, far from the bells and whistles of a trauma centre or cardiac surgeon. His tale had us on the edge of our seats, and his patient had a fantastic outcome thanks to the amazing care provided by John and the team at his health facility. I’ll take a deeper dive into OLV shortly, but what struck me by John’s talk was that although none of the team were thoracic specialists, what helped them to tackle the case so successfully was great teamwork, excellent communication, calling colleagues for advice to share the problem, and meticulous attention to detail to ensure that the simple stuff was done well.
We followed on briefly from John’s talk with a presentation from a previous HEMS registrar Dr Laura Connell, who has run a project to consider the cases from the last 10 years where OLV has been used, or a patient has been moved with a double lumen tube (DLT) in situ. Her work in this area has shown that these patients do come our way, and it is worth being aware of what a DLT is, how to check its position, and how to approach OLV in the retrieval patient. She ran a fantastic workshop in the afternoon to help us familiarise ourselves with this technique, and get hands on with a few different types of DLT.
OLV in a nutshell
Indications for OLV
There are absolute and relative indications for OLV. Relative indications essentially include surgical procedures where lung deflation is desirable to allow access to the structures of interest – for example oesophagectomy, thoracoscopy, lung volume reduction surgery, and so on. Absolute indications are of more interest to the critical care and retrieval practitioner, and tend to include problems where avoiding contamination of the unaffected lung is paramount, for example massive empyema, or pulmonary haemorrhage. In the case of bronchopleural fistula, selective ventilation of a single lung is necessary to avoid the delivered positive pressure tidal volumes disappearing via the fistula into the pleural/mediastinal spaces and subcutaneous tissues, instead of actually participating in ventilation.
Lung physiology, an extremely brief reminder
Clearly OLV is not a physiologically normal state, where we generate negative pressure within the thoracic cavity to inflate two lungs. In health our pulmonary circulation, a low pressure, low resistance circuit, tends to favour perfusion of alveoli where gravity is greatest, ie at the base of the chest in an upright, spontaneously ventilating human. Helpfully, this is also where ventilation is greatest, at the alveoli at the bases. This matching of Ventilation (V) and Perfusion (Q) sits in a balance where in normal physiology we achieve optimal gas exchange. This is fine tuned further by the process of hypoxic pulmonary vasoconstriction (HPV), which helps to divert blood away from oxygen-poor areas of the lung.
OLV pathophysiology
There are several problems, therefore, with taking a lung down. The first problem is that the patient is not starting from a place of health – the ‘good’ lung may not be that good, especially if there are co-morbidities like COPD, or concurrent problems like consolidation or atelectasis affecting that lung. The pulmonary circulation and right side of the heart may not be that good either – patients with chronic problems like OSA may have unrecognised right heart impairment, there may be innate problems with the heart itself such as mitral valve disease, which can cause pulmonary hypertension. The next problem with switching to positive pressure ventilation is that the fine balance of ventilation and perfusion is lost. No matter how fancy your ventilator, it will not distribute ventilation across the lung in the same way as in spontaneous ventilation. The patient is often supine, meaning that the perfusion of blood is spread preferentially across the posterior aspects of the lungs, rather than matched to the areas of best ventilation. The addition of PEEP, particularly higher PEEP required in problems like ARDS, can impair venous return and the distribution of pulmonary blood. Finally, the state of being ‘big sick’ can create havoc with HPV – acidosis, hypoxia, hypercarbia, the use of ketamine, and the effects of vasopressors/inotropes can all elevate pulmonary pressures.
In an operating theatre environment, we position a patient lateral, with the ‘bad’ lung uppermost, before taking that (non-dependent) lung down. This allows surgical access to the problem side of the chest, while the ventilated ‘dependent’ good lung is provided with better perfusion of blood thanks to gravity and the effect of HPV diverting blood away from the unventilated side. In the retrieval environment, it is problematic to position a patient laterally for transfer while a lung is down. The risk of tube/line dislodgement in that position is higher as monitoring is harder, and pressure area risks higher than when transported supine. That means that perfusion and ventilation might be extremely poorly matched in this patient, and inadequate gas exchange can produce hypoxia and hypercarbia, which in turn can produce a greater afterload for the right heart and poor forward flow into the left heart, with resultant haemodynamic mischief. This brings me to my main take home point:
OLV in PHARM – try not to unless you really can’t avoid it.
Can’t avoid it? Read on.
How to deliver OLV
While there are seemingly myriad devices and options, we can break them down like this:
Single lumen tube
Deliberate endobronchial intubation (obviously easier to select the right lung here, although also easier to accidentally block off the right upper bronchus which branches straight off the right main)
Using a bronchial blocker (less common, and probably not relevant to a transport scenario)
Double lumen tube (of which many flavours exist)
Using a single lumen tube
This is how John did it, and it’s a great option in an emergency. A single lumen ETT is something all crit care clinicians are familiar with, and it’s much easier and faster to position. A bougie can be used to help direct your tube into the right or left main bronchus.
Using a DLT
It’s pretty unlikely that a PHARM team will be required to position a DLT! However, as Laura’s project showed us, every so often we need to move a patient with one in situ, so let’s look at one in a bit more detail.
DLTs, the basics
What most people notice first about the DLT is that it’s big. The sizing is, annoyingly, conventionally described in French – a rule of thumb is 37Fr for women, 39Fr for men. 35Fr and 41Fr are also sometimes used. There are ways of formally assessing this sizing but we won’t focus on that here. It’s also much longer than a conventional ETT, comprising a tracheal lumen and a bronchial lumen. You’ll notice two cuffs – a clear, larger one for the trachea, and a smaller, blue one for the bronchus. Make sure to only use a 5mL syringe to inflate the bronchial cuff and always check cuff pressures. DLTs can be designed for either left main bronchus or right main bronchus insertion. By and large, the vast majority of DLTs used are left. This is because right sided DLTs are more tricky to position to avoid occlusion of that right upper bronchus. With a left sided DLT in situ, both lungs can be ventilated, the right (via the tracheal lumen) or the left (via the bronchial lumen).
Assessing a DLT: Position, position, position
The most common problem with the DLT is dislodgement. Even if the tube is well secured at the teeth (thoroughly recommended, as ever!), that does not exclude the possibility of micromovement at the distal end and dislodgement. The bronchial cuff can herniate into the trachea, or the whole tube can migrate into the left main bronchus. Your steps, in assessing a DLT, are therefore:
Find out what has been placed
size
side
depth
ease of insertion
confirm both cuffs up
check cuff pressures for both cuffs
Check that you can ventilate
Both lungs
Left lung (bronchial lumen in Left DLT)
Right lung (tracheal lumen in Left DLT)
Fibreoptic check of position (using the tracheal lumen)
Using the fibreocope to check position of the DLT is crucial, as you may well need to repeat this throughout the journey. The view from the tracheal lumen should be of the carina, with trachealis lying posteriorly and the right main bronchus disappearing off to the right. The left main bronchus will be obscured by the bronchial lumen, with a visible crescent of the bronchial cuff in view. No visible cuff means the tube is too deep. If the cuff obscures the view of the carina or RMB then the tube is too shallow.
TIP: Do your first check at the referring hospital with the anaesthetist who placed the tube beside you to confirm you are both happy the tube is in a good spot. Take a photo of the ambu screen showing the tube in the correct position. You can use this for comparison if you need to re-review en route.
Moving to one lung
If you need to take your patient from two to one lung ventilation, this is relatively simple once a correctly positioned DLT is in situ. Using either a clamp or a device built into the tube connectors, you can occlude the ventilation of either the tracheal or bronchial lumens. Always perform a clinical check and confirm your ventilator settings and pressures every time you do this. Where possible, an ABG on one lung will help you to understand the quality of gas exchange before you start moving.
Clearly avoiding injury to the one ventilated lung is crucial. As a rule of thumb, aim for a tidal volume of 6mL/kg IBW, with peak airway pressures <35 cmH2O. Aim for PEEP between 5-8cmH2O. Try to avoid using high fractions of O2 given the risk of pulmonary injury from hyperoxia.
Moving a patient who is on one lung
Dislodgement is a common problem. ALWAYS confirm the tube position after repositioning the patient (ie moving to the stretcher), and be suspicious any time you go over a speed bump that the tube may have moved. You will need to have the fibreoscope out and ready to use throughout the transfer to help you do your position check.
Moving back to two lungs
Should you need to ventilate both lungs, be mindful that the unventilated lung will have now collapsed. Much like the metaphor of the deflated balloon, it will require support to help reinflate again. Doing this with hand ventilation via a self-inflating bag is more effective than trying to use the ventilator.
Troubleshooting – hypoxia on one lung
Hypoxia on One Lung is a common anaesthetic exam question which calls for a structured approach. I am a fan of Laura’s ABC-style strategy, which she adapted for our retrieval setting.
Hypoxia on OLV
Stop transport if possible Increase FiO2 to 100% Check breathing circuit connections Have a low threshold for calling DRC for advice
Airway
Confirm DLT depth Examine DLT position using fibreoscope Consider suction
Breathing
Assess the chest – auscultate if you can, otherwise consider lung ultrasound to exclude a new PTX Check ventilator settings, has anything changed? Are you definitely delivering the volumes and FiO2 you have dialled up? Titrate PEEP to the ventilated lung Consider additional O2 to the bad lung – connect a tracheal suction catheter to oxygen tubing and feed down the lumen to the unventilated lung. Insufflate with no more than 2L/min O2 Consider CPAP to the unventilated lung – use a dedicated CPAP device (available in some operating theatres) or attach your laerdel bag + PEEP valve set to no greater than 5cmH2O
Circulation
Consider bedside echo Support cardiac output where necessary to ensure adequate lung perfusion. Consider blood if indicated Be aware that high doses of certain vasoactive/inotropic medications (particularly alpha 1 agonists) may impact on pulmonary vascular pressures
Check temp and maintain normothermia where possible
Still failing?
Consider switching to intermittent two lung ventilation If you haven’t called for advice yet, you should do so!
Problem solved?
Downtitrate the FiO2 again as tolerated
Finally
Once you have arrived and safely handed over to the receiving team, make sure you reward yourself with an ice cream and a pat on the back! We would love to hear about your case at coffee and cases, or at a HEMS education day!
Some reading
Tarry, D & Powell, M (2017) Hypoxic pulmonary vasoconstriction, BJA Education, Volume 17, Issue 6, June 2017, Pages 208–213, https://doi.org/10.1093/bjaed/mkw076
Heseltine, N & Knowles, A. (2021) Bronchoscopic insertion of double lumen endotracheal tubes and bronchial blockers. Anaesthesia and Intensive Care Medicine, Volume 22, Issue 3, March 2021, Pages142-147 https://doi.org/10.1016/j.mpaic.2021.01.012
Ashok, V & Francis, J (2018) A practical approach to adult one lung ventilation. BJA Education, Volume 18, Issue 3, March 2018, Pages 69-74 https://doi.org/10.1016/j.bjae.2017.11.007
Sydney HEMS acknowledges the Australian Aboriginal and Torres Strait Islander peoples as the first inhabitants of the nation and the traditional custodians of the lands where we live, learn and work.


 AiR Videos